CMSV6 Platform Fast User Guide
Function Description
This document aims to provide a quick start guide for first-time users of the CMSV6 Platform, helping them better understand and utilize the platform software.
Users can quickly familiarize themselves with the platform software by following this workflow:
[How to Log In to the Platform] > [Add Company Information] > [Add Vehicle Information] > [Device Reporting] > [Platform Monitoring]
Operation Instructions
Step 1: How to Log In to the Platform
1.1 HTTP Server
Open the following URL format in the browser address bar: http + Server IP + Web Port (e.g., http://121.13.64.17:80), then enter your account, password, and verification code to log in.

1.2 HTTPS Server
Open the following URL format in the browser address bar: https + Domain Name (e.g., https://vx.cms.com), then enter your account, password, and verification code to log in.

Special Notes
a. How to determine if your server uses HTTP or HTTPS
Answer: After server deployment, the default protocol is HTTP. To enable HTTPS, you need to start the Nginx service.
b. How to enable HTTPS
Answer: Refer to the operation manual via this link: https://help.cmsv8.com/helpCenter/doc/index.html?isStudy=1&pageType=1&docId=479&type=1
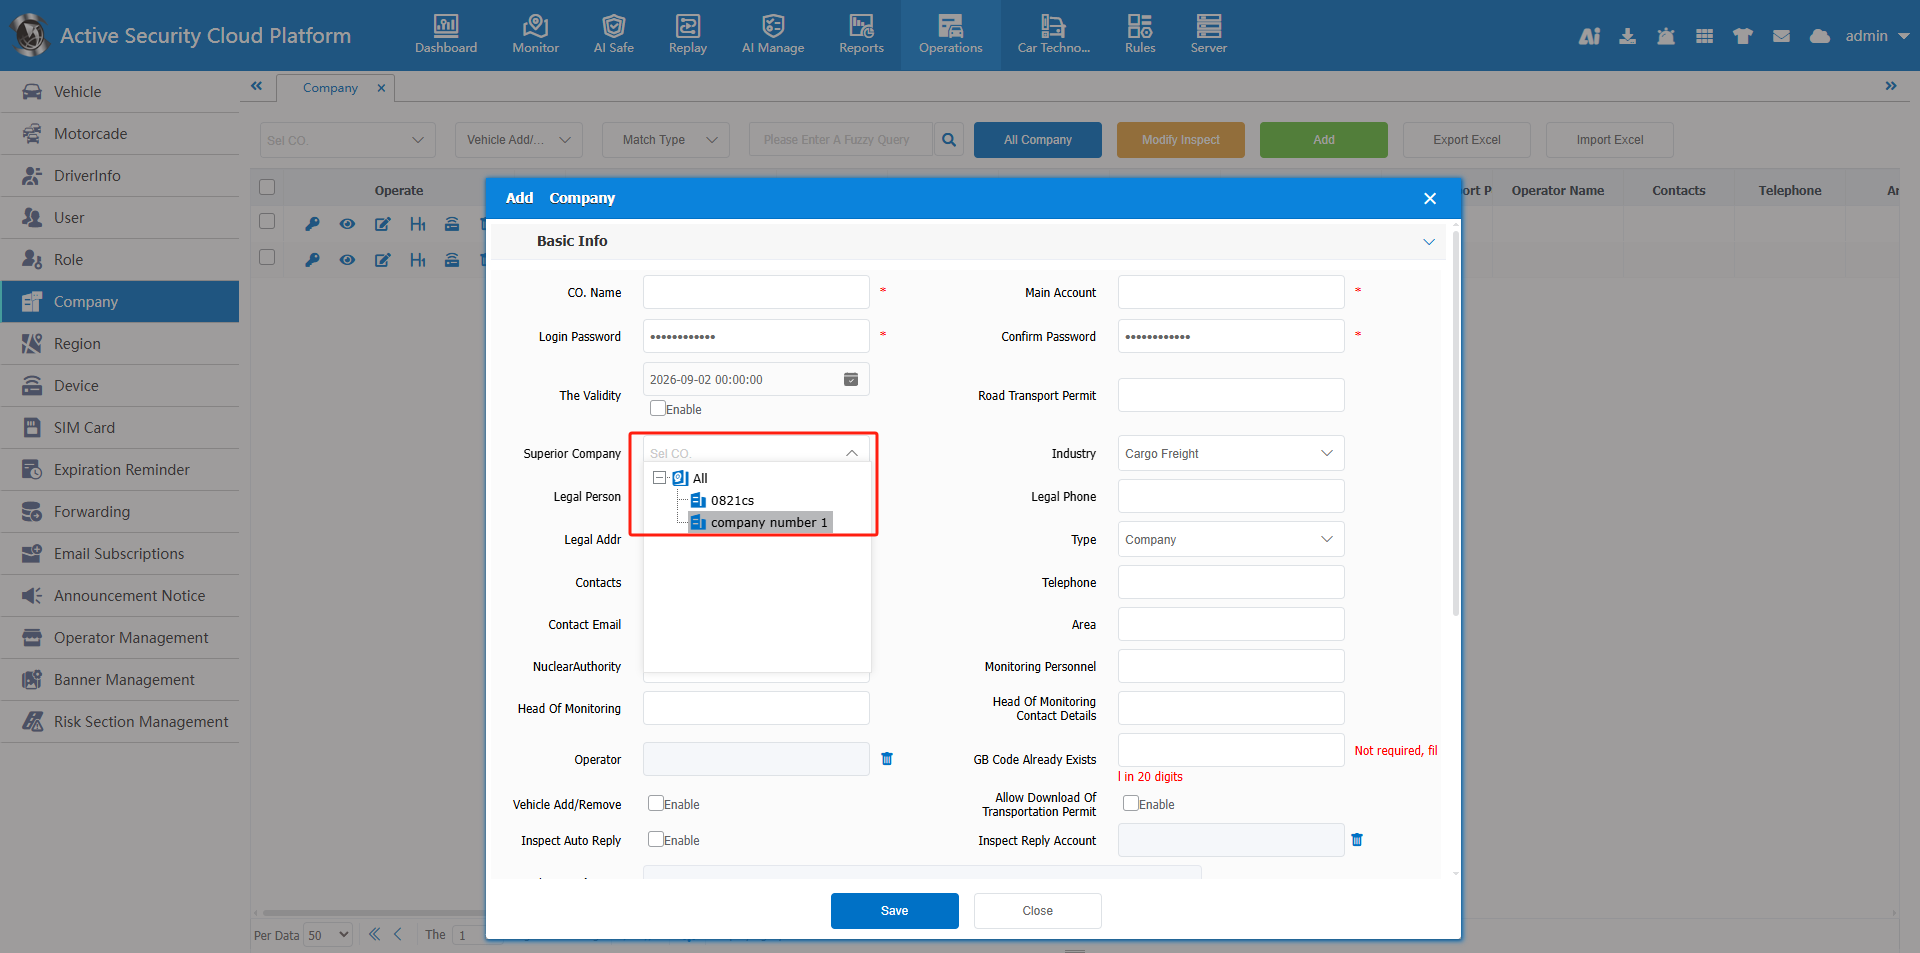
Step 2: Add Company Information
a. Go to Company Information and click [Add]. Enter the company name, primary account, and other required information, then click [Save]. (Fields marked with * are mandatory.)

b. After creating a company, you can add sub-companies. When adding a sub-company, select its parent company from the dropdown list. If no parent company is selected, the new company will be created as a top-level company.
Special Notes
a. A company primary account is automatically created along with the company; this account has administrator privileges for the company.
b. The password for the primary account can be customized; the default password is: G-sky.1973
c. There is no limit to the number of company hierarchy levels. A company can have fleets, and sub-fleets can be created under existing fleets. Vehicles can be assigned to any fleet level.
d. There is no limit to the number of fleets that can be created under a company.
Step 3: Add Vehicle Information
Go to Vehicle Information and click [Quick Vehicle Addition]. Fill in the mandatory fields marked with a red asterisk: Device Number, License Plate Number, Terminal Type, and Affiliated Company, then click [Save].
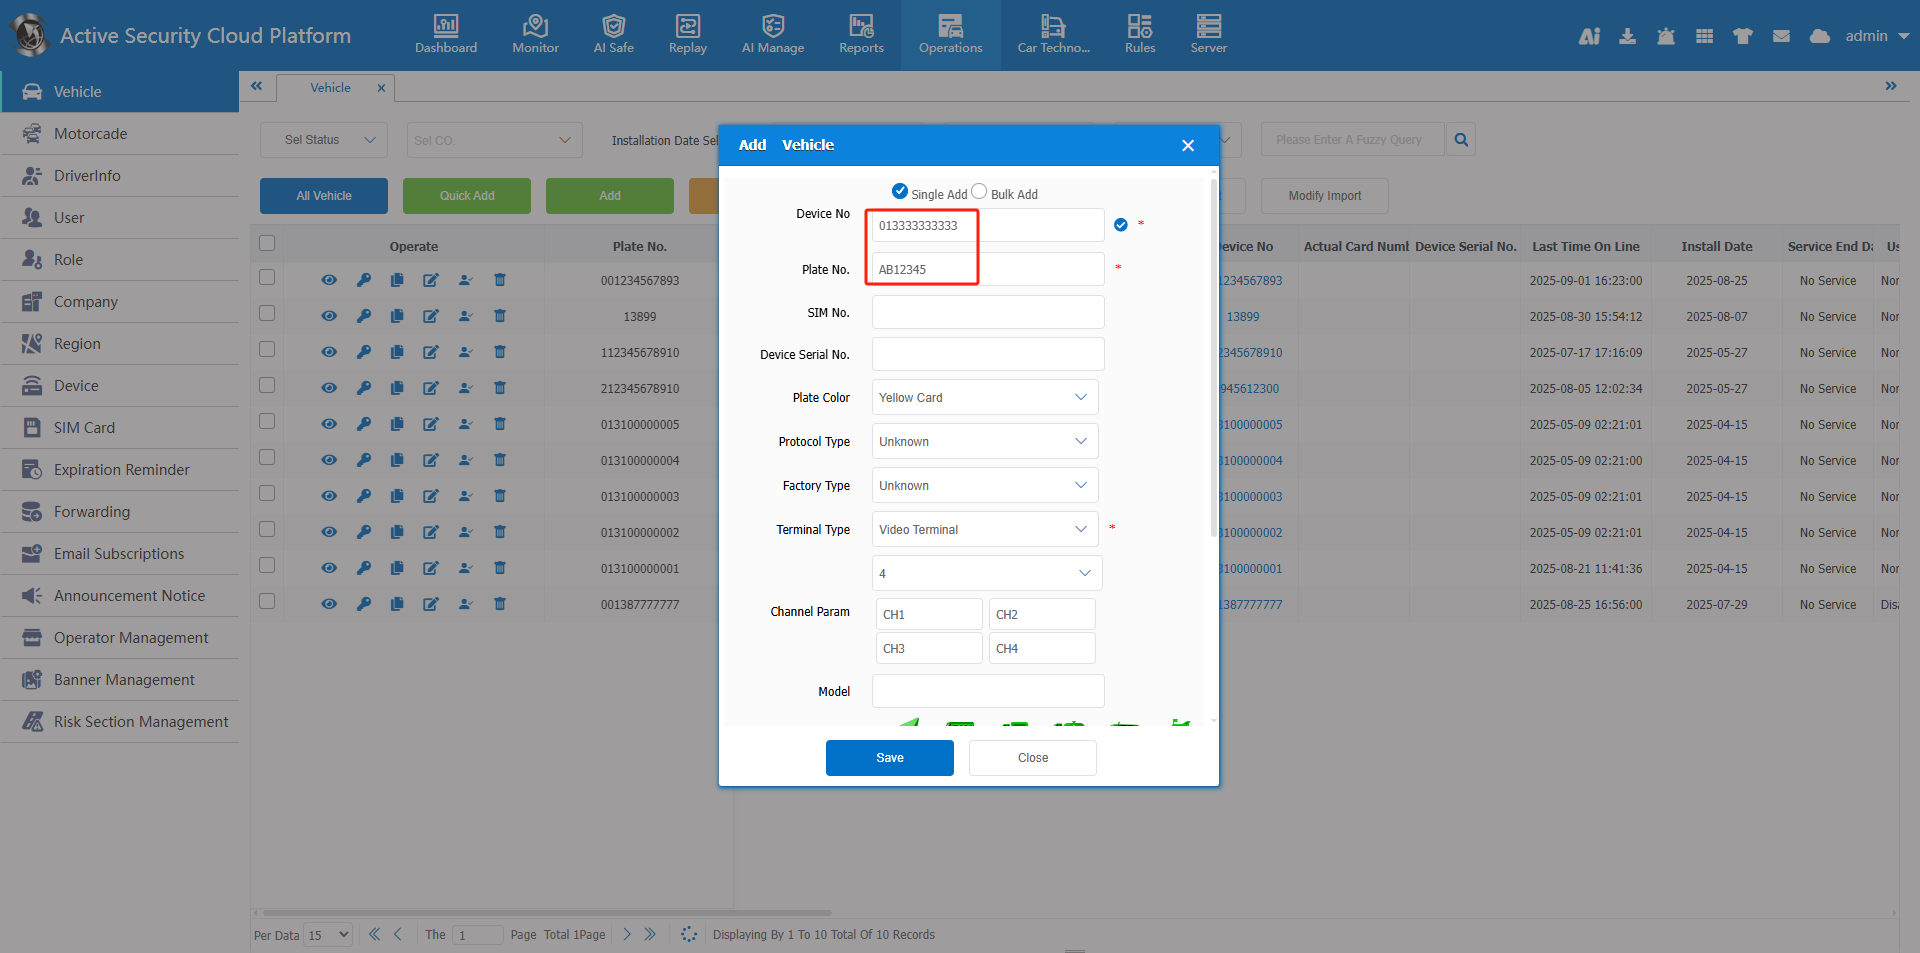
Special Notes
a. For video devices, select Video Terminal as the terminal type and specify the number of channels.
b. The protocol type defaults to [Unknown] and will be automatically identified by the system.
Step 4: Device Reporting
a. The device number for Ministry Standard Protocol devices must be 12 digits. If the original number is less than 12 digits, pad zeros at the beginning to make up 12 digits. If it exceeds 12 digits, use the last 12 digits.
b. Device number parameters may vary by manufacturer. Some use an 11-digit SIM card number padded with a leading zero; others use an 11-digit terminal phone number padded with a leading zero. For details, consult your device manufacturer.
c. Configure the server IP and online port on the device. The default port is 6608.
Step 5: Platform Monitoring
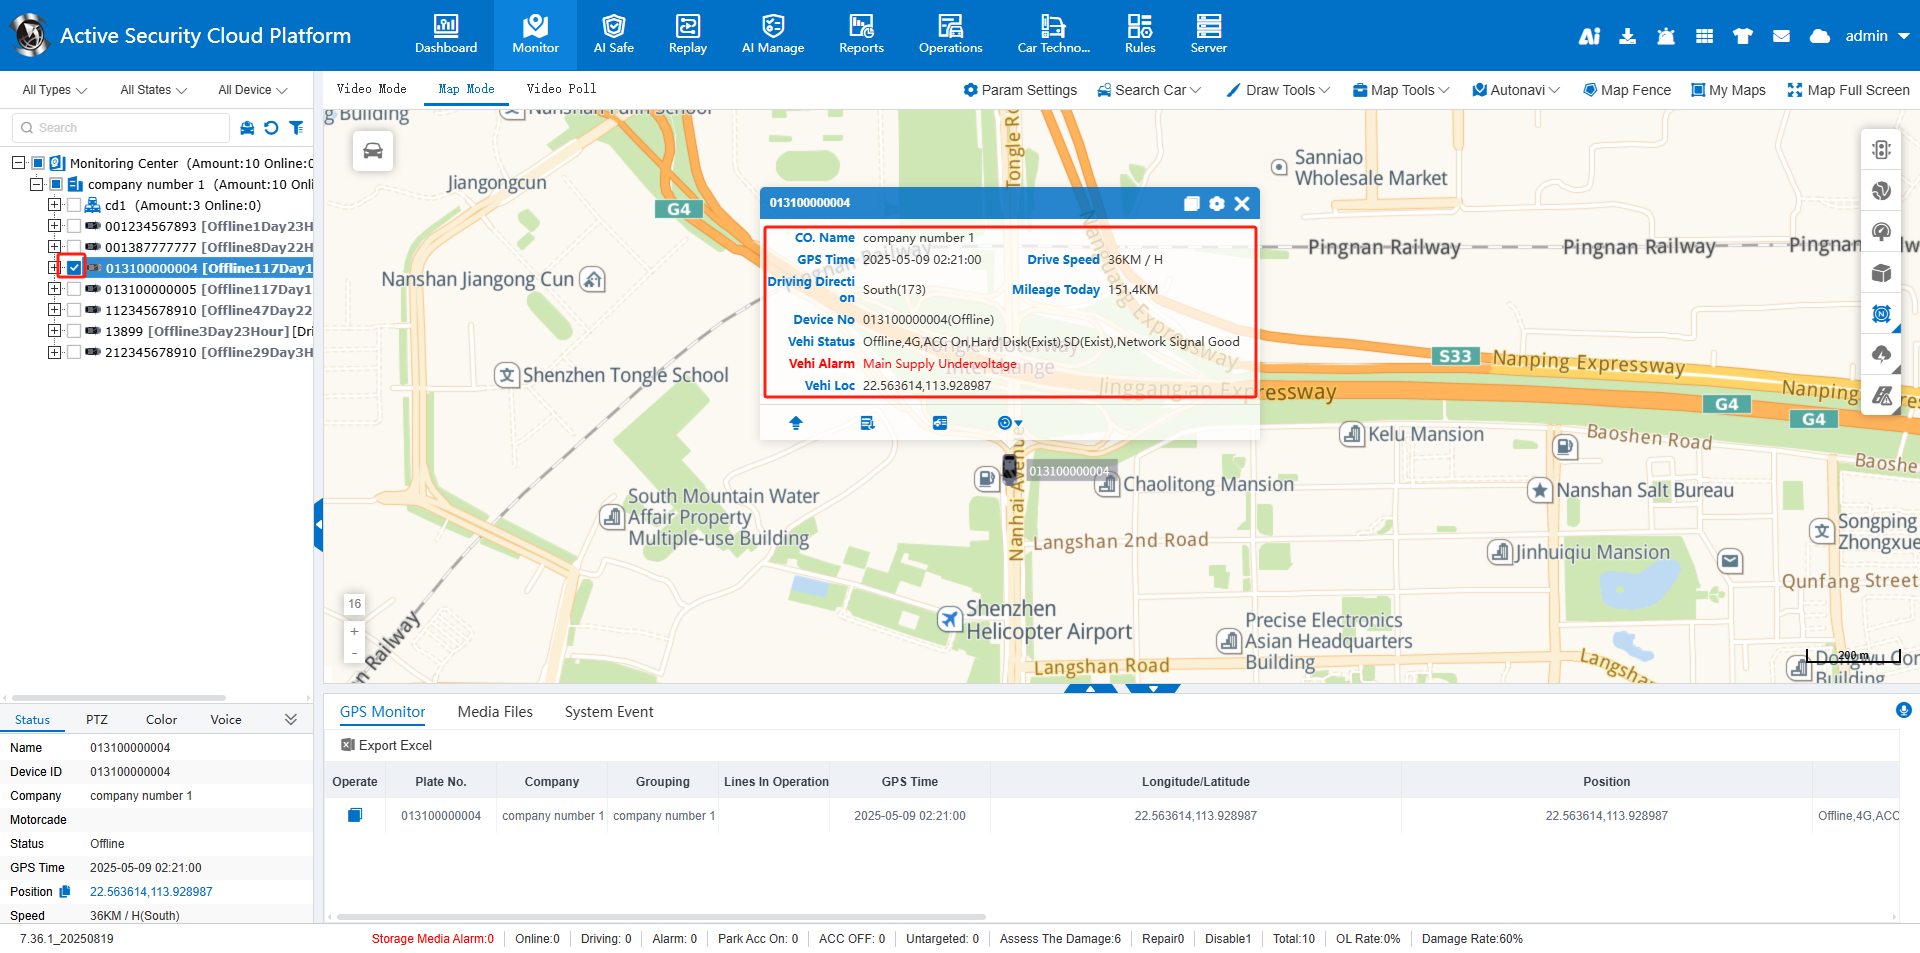
5.1 How to View Real-Time Positioning
a. Go to Real-Time Monitoring > Map Mode. In the vehicle list on the left, check the box next to the license plate number to display the vehicle’s real-time position on the map.
b. The pop-up bubble displays vehicle details, including its affiliated company, timestamp, speed, mileage, location, and current status.
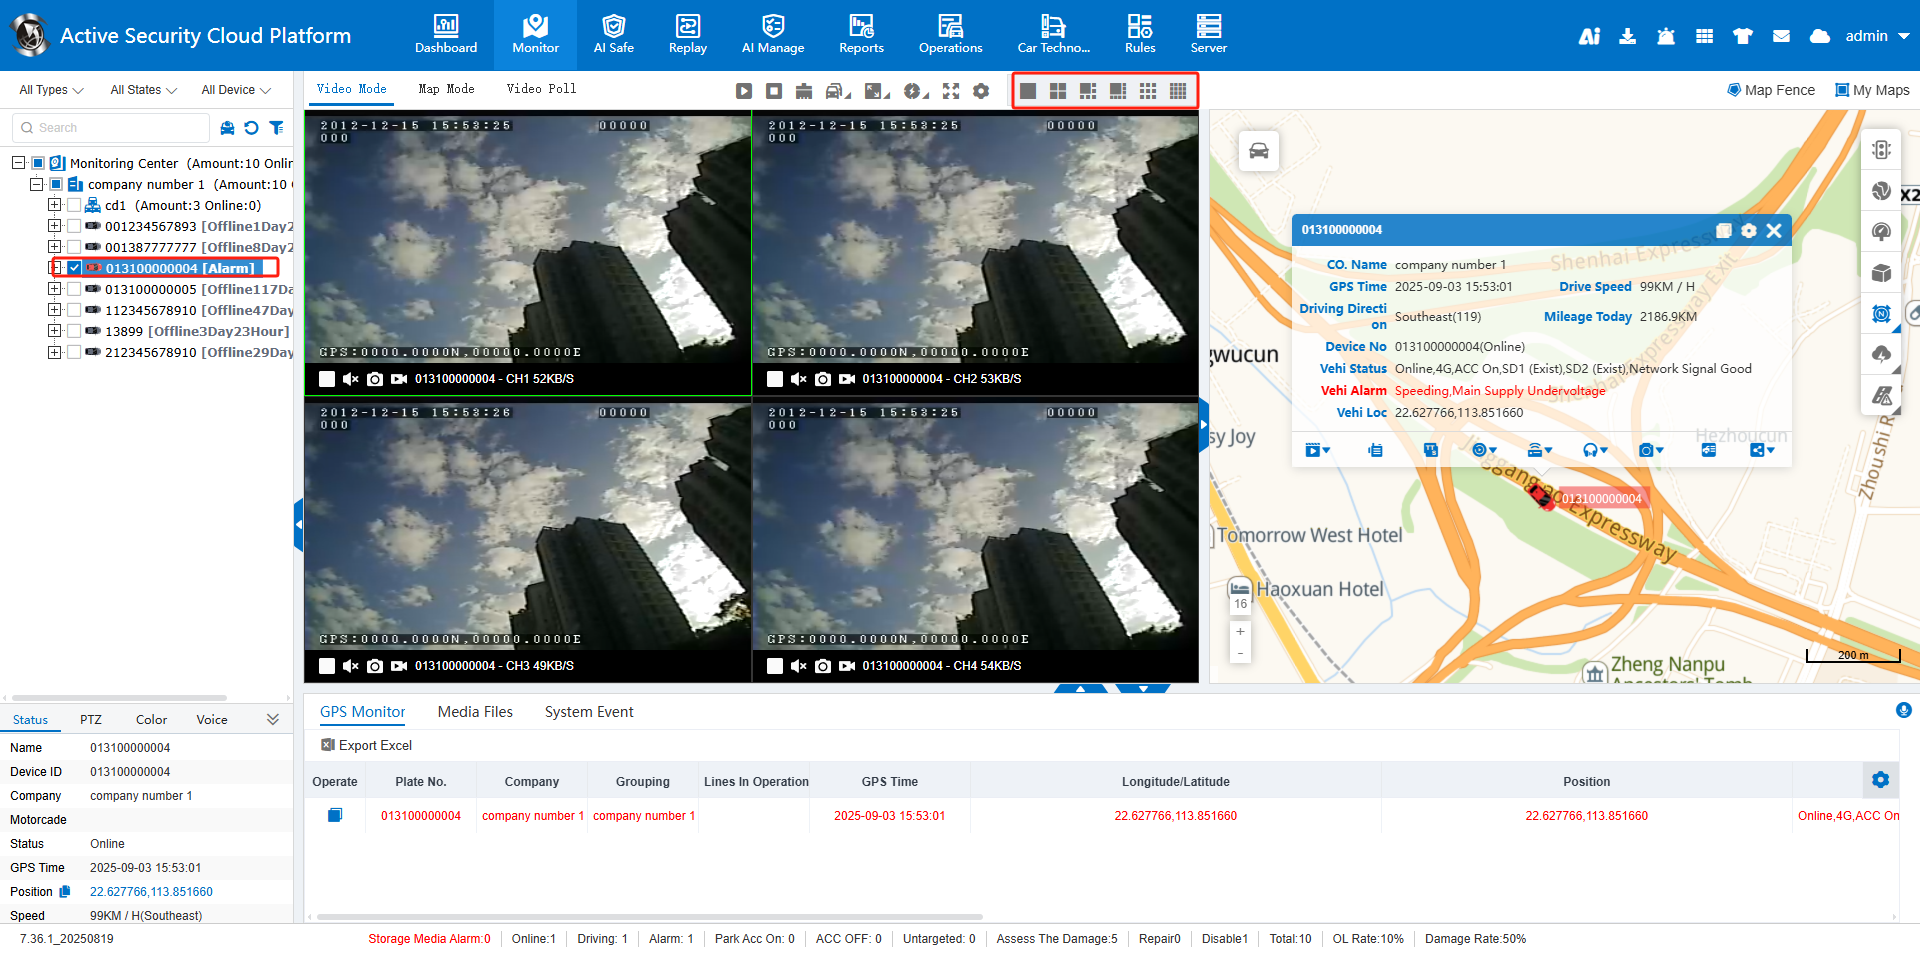
5.2 How to View Real-Time Video
a. Switch to Video Mode and select the desired number of video display windows.
b. In the vehicle list on the left, double-click an online vehicle to start real-time video preview.
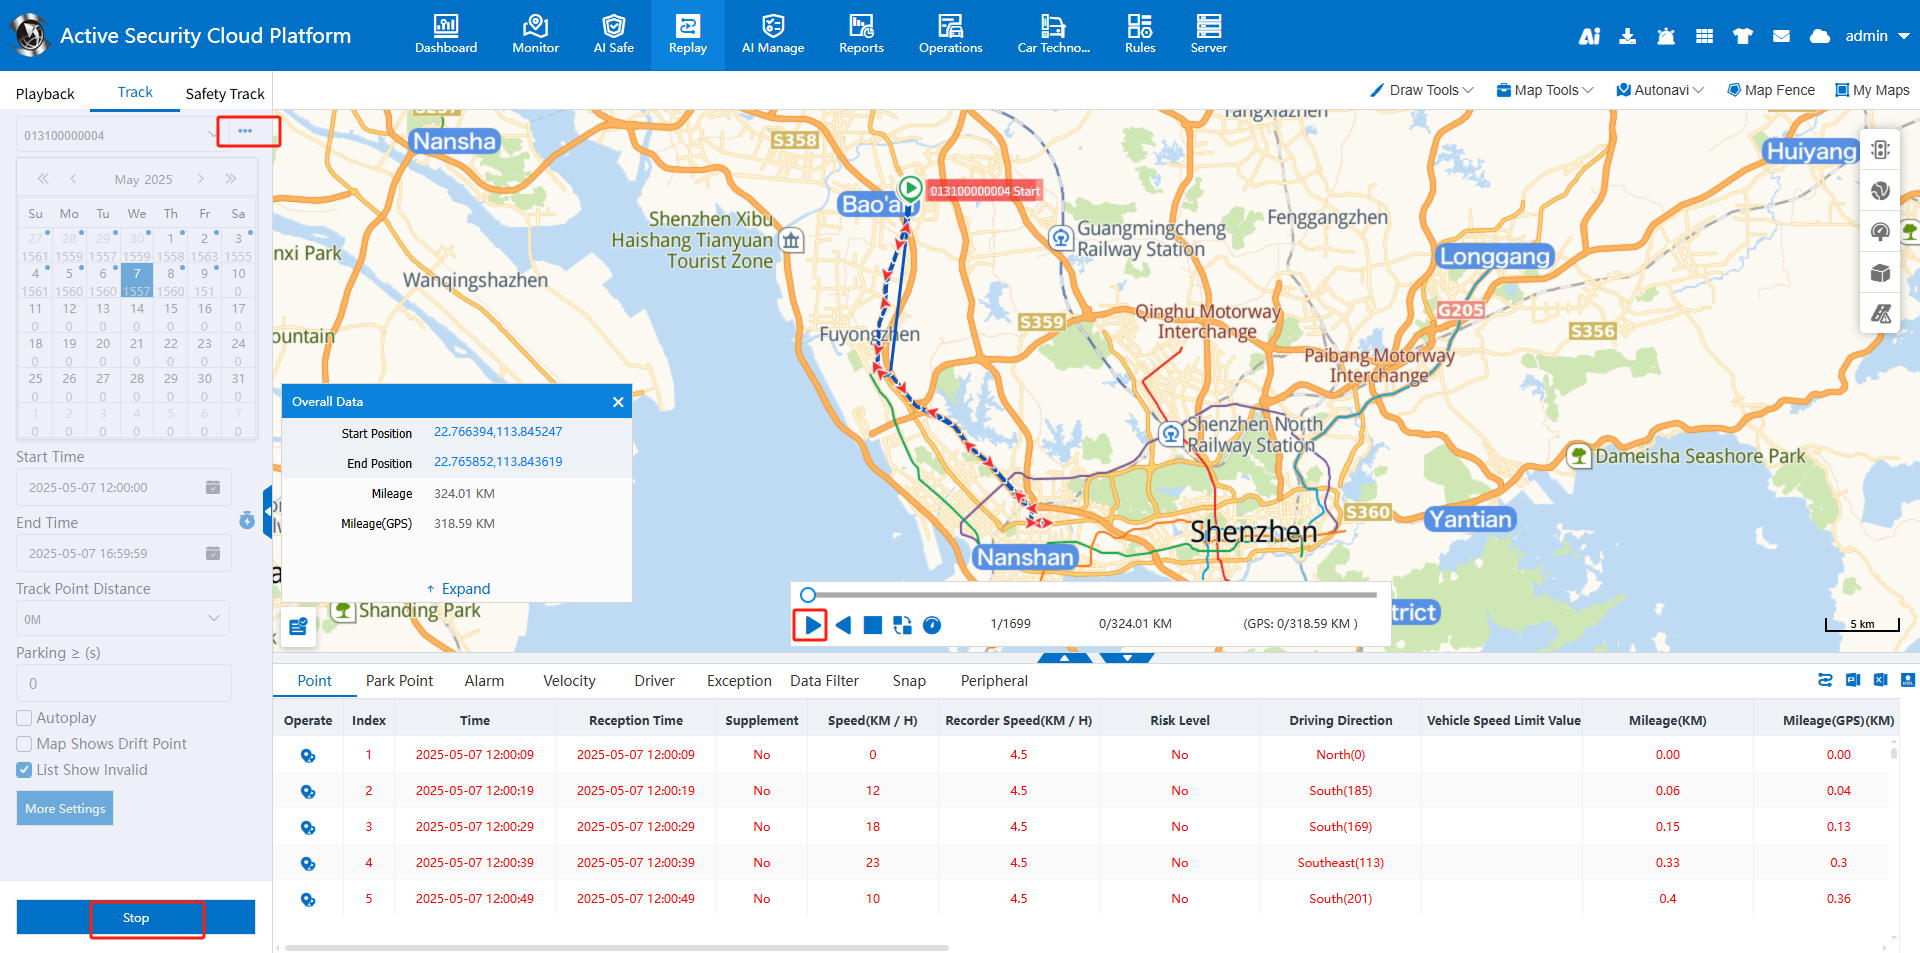
5.3 How to Play Back Trajectories
a. Go to Historical Playback > Trajectory Playback. Select the target vehicle, playback date, and time range, then click [Search Now] to retrieve trajectory data.
b. The trajectory distribution map is displayed in the map area on the right-middle of the page, and the trajectory point list is shown below the map.
c. Click [Play] to start trajectory playback. Trajectory data can be exported in Excel or PDF format.
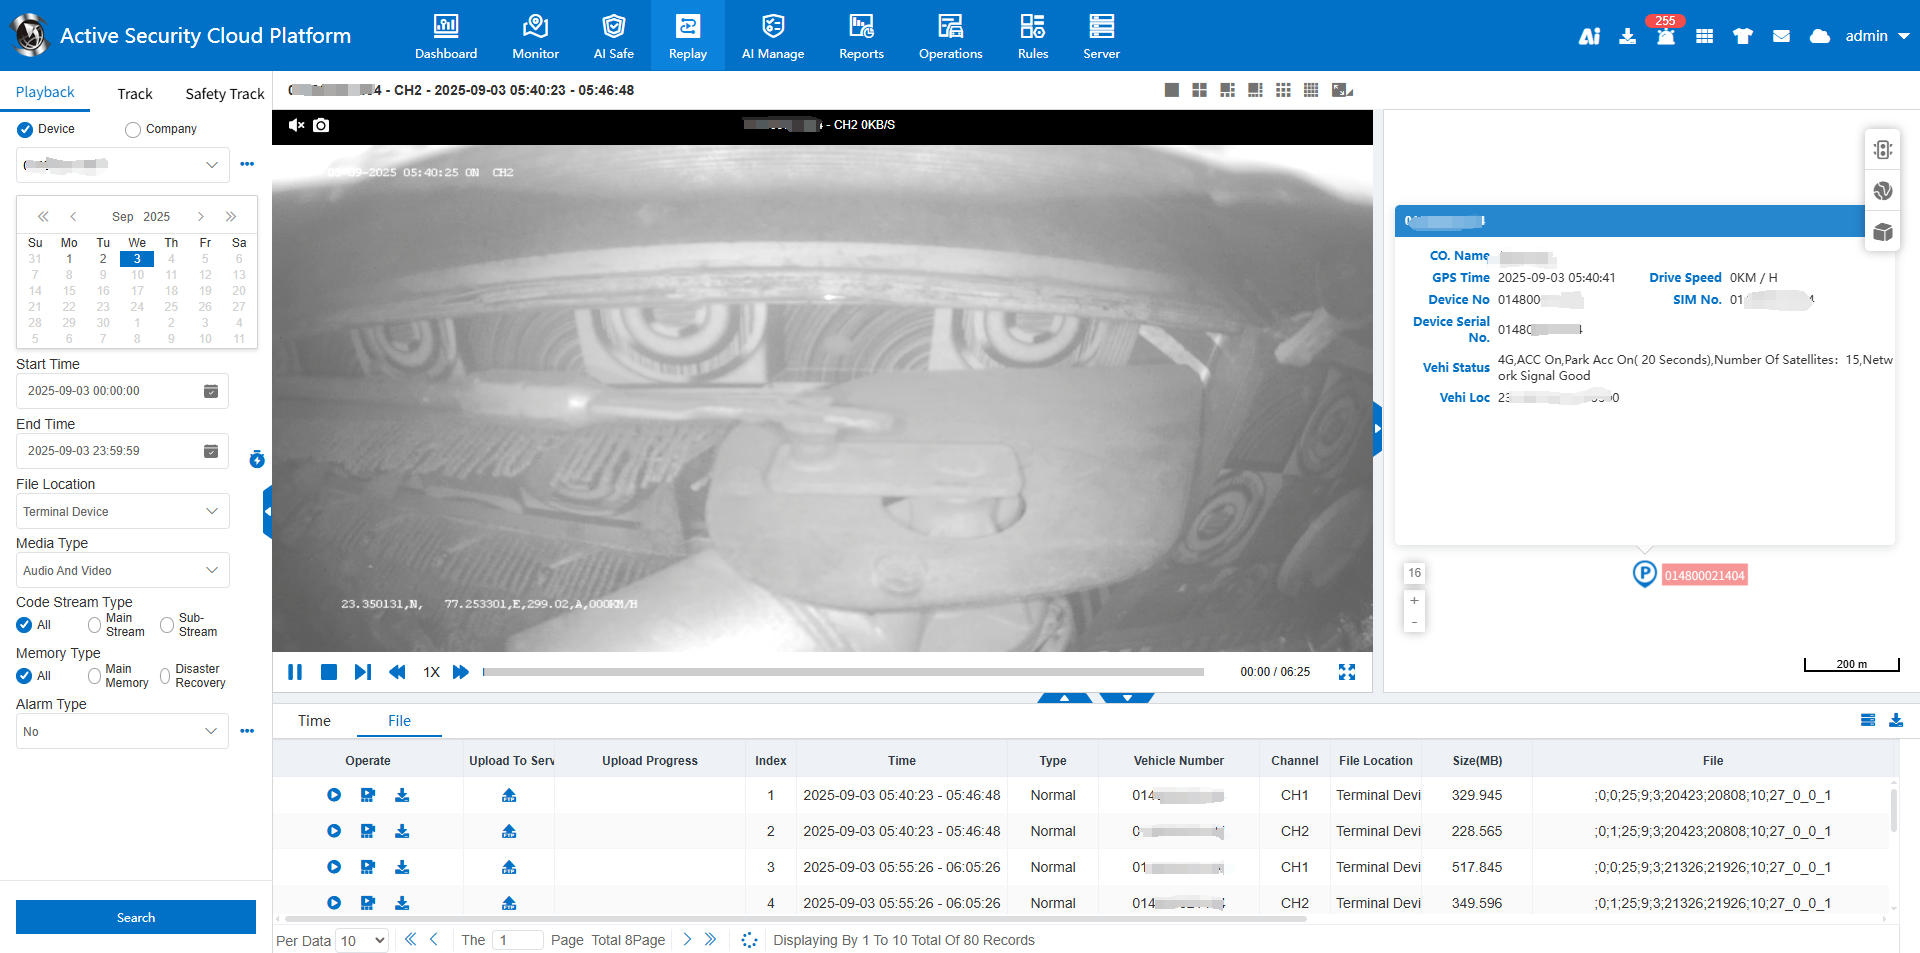
5.4 How to Play Back Recorded Videos
a. Switch to Video Playback. You can search for video files by device or company; company-based search is only supported for videos stored on the Storage Server and Download Server.
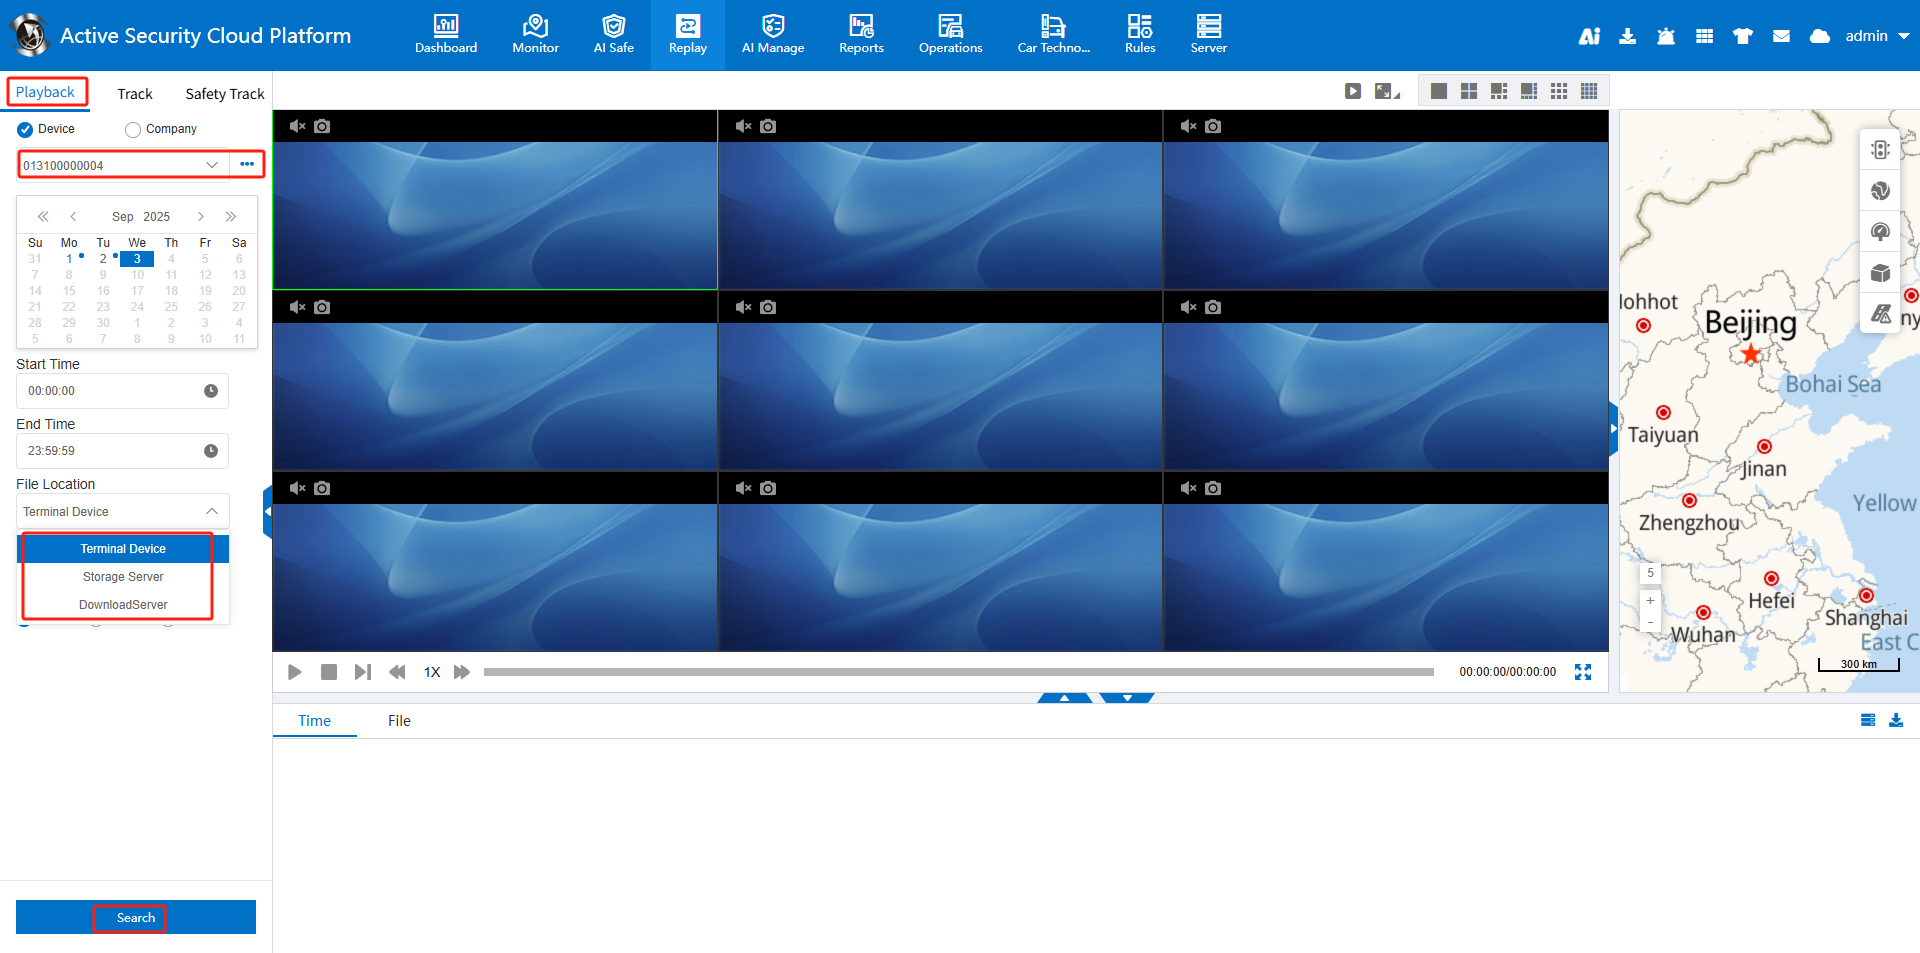
b. Select the target vehicle, date, and time range. Choose the file location from the options: Terminal Device, Storage Server, or Download Server.
c. File Location Descriptions:
-
Terminal Device: Videos stored on the terminal’s SD card or hard disk.
-
Storage Server: Videos uploaded to the server’s disk.
-
Download Server: Videos downloaded via Wi-Fi.